Admin
Admin

Number of posts : 4171
Age : 66
Location : Texas
Registration date : 2008-10-24
 | | Subject: Fence Post pumpkins Fri Aug 21, 2009 8:49 am | |
| 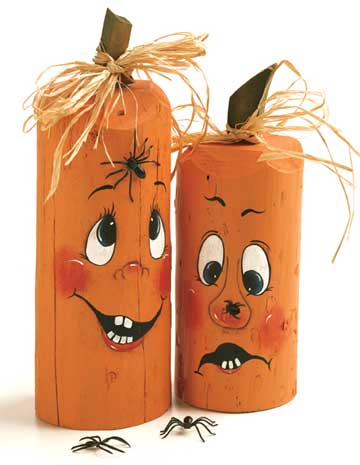 Fence posts are available in several diameters and lengths at home centers and lumberyards. Most outlets will cut the post to the desired lengths for a nominal fee. After the fence posts have been cut to the specified lengths (see step 2, below), let the pieces dry for several days before painting them. Cracks may appear at this time; however, these cracks will add character to the pumpkins. Fence posts are available in several diameters and lengths at home centers and lumberyards. Most outlets will cut the post to the desired lengths for a nominal fee. After the fence posts have been cut to the specified lengths (see step 2, below), let the pieces dry for several days before painting them. Cracks may appear at this time; however, these cracks will add character to the pumpkins.
6-inch length of 1x4-inch pine
Fence post, 5 inch diameter
Accessories: felt hats, plastic spiders, or silk flowers, natural raffia
Acrylic paint: black, burnt umber, red, green, light green, pumpkin, blue, white
Paintbrushes: #8 synthetic flat, #1 synthetic liner
Stencil brush
Sponge brush
Paper: tracing and transfer paper
Scrollsaw and #5 blade
Bandsaw
Stylus
Sandpaper
5-minute epoxy
Exterior varnish
2. Trace the pumpkin stem and face patterns with tracing paper. Transfer the stem outlines onto a 6-inch length of 1x4-inch pine.
2. Cut out the stem pieces with a scrollsaw, using a #5 blade. Cut the post with a bandsaw into the following lengths: 12 inches and 9-1/2 inches. To bevel the tops, bandsaw four or five slices from the 12 inch and 9-1/2 inch lengths.
3. Using a sponge brush, base-coat all the fence post surfaces pumpkin.
4. Use a #8 flat brush to fill in solid areas and a #1 liner brush for the details. Copy the face details to the posts with transfer paper. Mix green and water 1:1, and base-coat the stems. Shade the edges with undiluted green.
5. Using white, paint the eyes. Let the paint dry, and paint the pupils black. Float blue on the pupils as shown on picture. Then shade behind the eyes with burnt umber where shown.
6. Fill in the mouths with black, and add white teeth. Float red on the lower lips. With burnt umber, float on the noses. Float white highlights on the noses. Lightly stipple red on the cheese and the noses with a stencil brush.
7. Using black, paint the eyebrows, the mouth lines, and the eyelashes. Add white highlight comma strokes on the cheeks, the noses, and the pupils. Dip a stylus into white, and dot the highlights on the pupils.
8. Sand spots of paint from areas where the stems attach. (Glue and epoxy won't bond permanently to painted or varnished surfaces.) Epoxy the stems to the pumpkin tops. Apply two coats of exterior varnish, allowing ample drying time after each coat.
9. Embellish the pumpkins with raffia bows, felt hats, plastic spiders, silk flowers, and other seasonal trims. | |
|